k8s 에 nexus 설치하고 docker repository를 만들어서 docker 로그인을 해보자
nexus 설치는 김동완님의 블로그를 참조했는데 일단 출처 블로그 주소는 아래와 같다.
[Nexus] Nexus 설치 및 Repository 구축 방법 (Kubernetes)
외부망 통신이 되지 않는 폐쇄망 환경에서 소스 빌드를 할 때 Dependency를 받아오지 못하는 문제가 있음이런 환경에서는 보통 자체적으로 Nexus를 구축하여 Repository를 구성하여 운영함이때 Repository
velog.io
기존에 구성한 istio가 있기때문에 ingress 부분은 삭제하고, context-path 지정을 위해 initContainers 를 추가하였다.
---
apiVersion: v1
kind: PersistentVolumeClaim
metadata:
  name: nexus-data
  namespace: nexus
spec:
  accessModes:
  - ReadWriteMany
  resources:
    requests:
      storage: 20Gi
  storageClassName: nfs-client # 사용하는 sc로 변경
  volumeMode: Filesystem
---
apiVersion: apps/v1
kind: Deployment
metadata:
  name: nexus
  namespace: nexus
spec:
  progressDeadlineSeconds: 600
  replicas: 1
  revisionHistoryLimit: 10
  selector:
    matchLabels:
      app: nexus-server
  strategy:
    rollingUpdate:
      maxSurge: 25%
      maxUnavailable: 25%
    type: RollingUpdate
  template:
    metadata:
      creationTimestamp: null
      labels:
        app: nexus-server
    spec:
      initContainers: #custom 설정은 /nexus-data/etc/nexus.properties에 하면 된다.
      - name: set-nexus-context
        image: sonatype/nexus3:3.45.1
        command:
        - /bin/sh
        - -c
        - mkdir -p /nexus-data/etc && echo 'nexus-context-path=/nexus' >> /nexus-data/etc/nexus.properties
        volumeMounts:
        - mountPath: /nexus-data
          name: nexus-data
      containers:
      - image: sonatype/nexus3:3.45.1
        imagePullPolicy: IfNotPresent
        name: nexus
        ports:
        - containerPort: 8081
          protocol: TCP
        resources:  ## resource는 사용환경에 맞게 유동적으로 조절
          limits:
            cpu: 1.5
            memory: 4Gi
        terminationMessagePath: /dev/termination-log
        terminationMessagePolicy: File
        volumeMounts:
        - mountPath: /nexus-data
          name: nexus-data
      dnsPolicy: ClusterFirst
      restartPolicy: Always
      schedulerName: default-scheduler
      securityContext: {}
      terminationGracePeriodSeconds: 30
      volumes:
      - name: nexus-data
        persistentVolumeClaim:
          claimName: nexus-data
---
apiVersion: v1
kind: Service
metadata:
  name: nexus-service
  namespace: nexus
spec:
  ports:
  - name: web
    port: 80
    protocol: TCP
    targetPort: 8081
  - name: web-secure
    port: 443
    protocol: TCP
    targetPort: 8081
  - name: docker-registry
    port: 12000
    protocol: TCP
    targetPort: 12000
  selector:
    app: nexus-server
  sessionAffinity: None
  type: ClusterIP
nexus namespace에 배포하자. 약간의 시간이 걸리므로 그 사이에 virtual service에 /nexus route를 추가해보자.
apiVersion: networking.istio.io/v1beta1
kind: VirtualService
metadata:
  name: default-route
  namespace: default
spec:
  gateways:
  # 생략
  http:
  # 생략
  - match:
    - uri:
        prefix: /nexus
    route:
    - destination:
        host: nexus-service.nexus.svc.cluster.local
        port:
          number: 80
https://도메인명/nexus로 접근해보면 최초 접속화면으로 이동이 되는데 로그인을 누르면 패스워드 경로가 나온다. 참고해서 로그인하고 패스워드를 새로 입력하자.
그리고 이제 docker repository를 만들어보자.
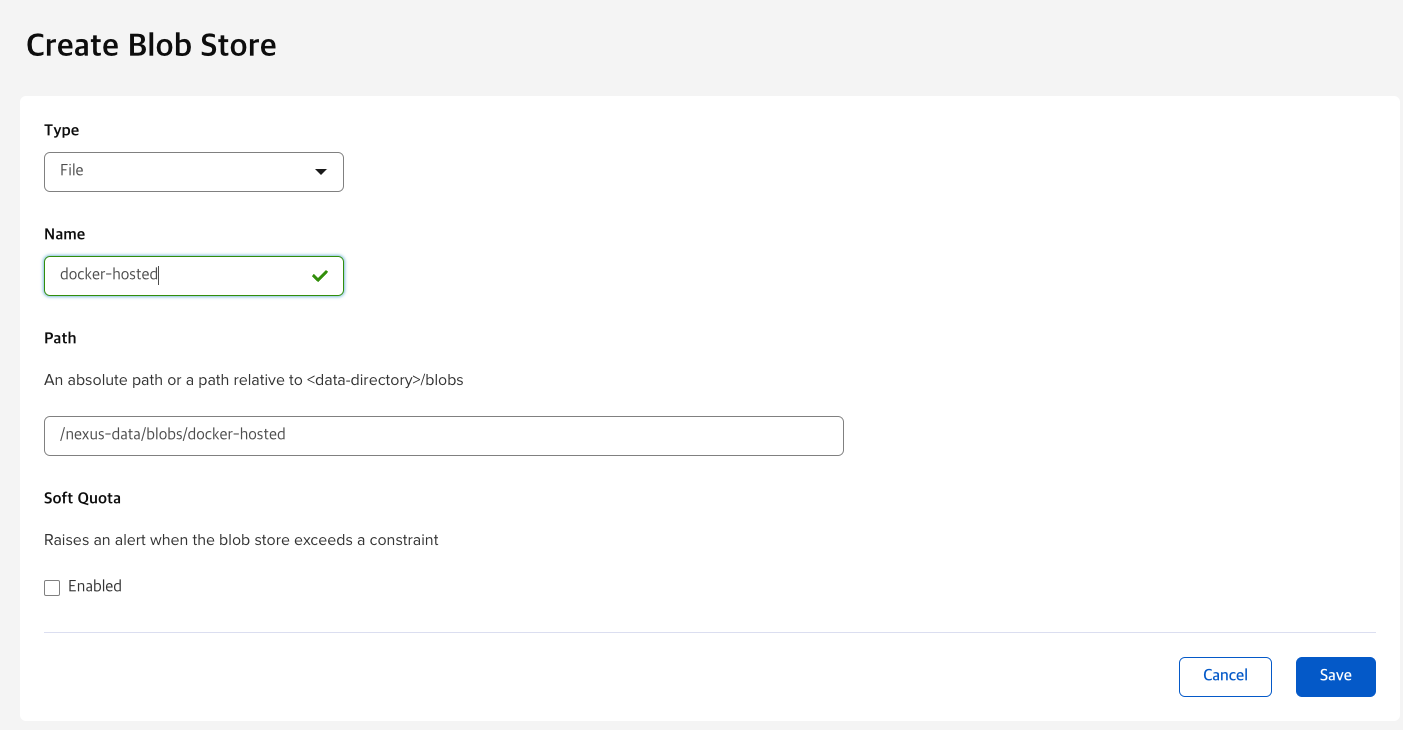
상단의 톱니바퀴 아이콘을 누른후 Blob Stores 메뉴로 이동한다.
Create Blob Store 버튼을 누르고 File type으로 docker-hosted 이름 입력후 Save 한다.
Repositories 메뉴로 이동하여 Create repository를 클릭하고 docker(hosted)를 클릭해준다. 상세 정보 입력을 하는데 Name, HTTP, Blob store 와 같은 정보를 다음과 같이 입력해주고 Create repository 버튼을 눌러 생성해준다.
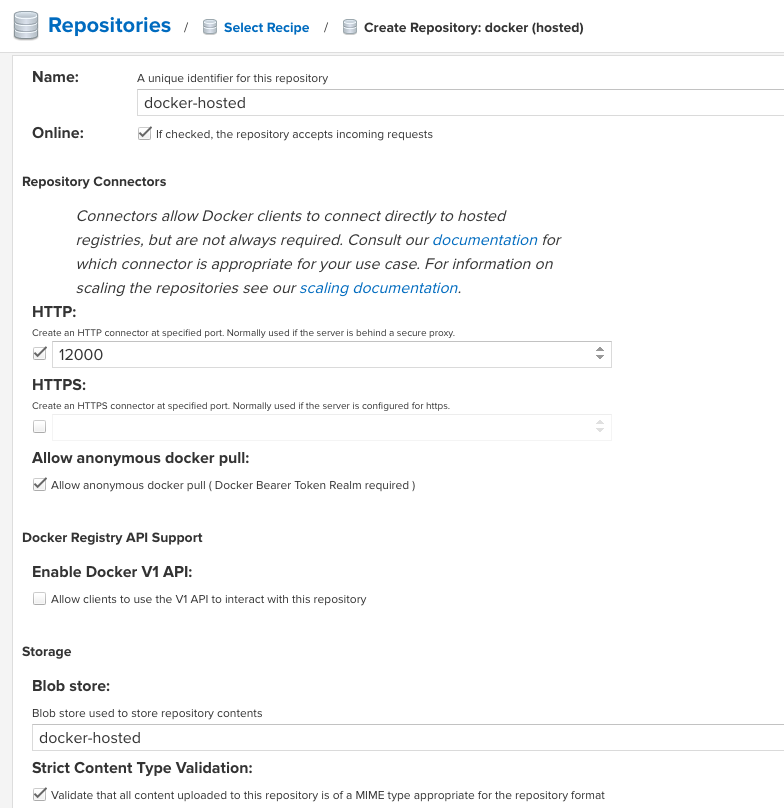
URL이 다음과 같이 나오는데 /nexus/repository/docker-hosted 경로로 이제 docker login을 하도록 해보자.

virtual service에 다시 route 경로를 추가해주는 위에서부터 선적용 되므로 /nexus 상단에 추가해주는 부분은 유념해야한다.
  - match: # /nexus 보다 위에 추가한다.
    - uri:
        prefix: /nexus/repository/docker-hosted
    route:
    - destination:
        host: nexus-service.nexus.svc.cluster.local
        port:
          number: 12000
  - match:
    - uri:
        prefix: /nexus
    route:
    - destination:
        host: nexus-service.nexus.svc.cluster.local
        port:
          number: 80
이렇게 까지 적용하고 docker login https://<도메인>/nexus/repository/docker-hosted로 접근하면 https://<도메인>/v2 로 넘어가며 로그인이 되지 않지만, 브라우저 상에서 직접 접근했을때는 다음과 같이 보여진다.

이제 nginx reverse proxy에 location을 추가해본다.
/etc/nginx/conf.d/default.conf 에 기존에 작성한 location / { .. } 을 참고하여 다음과 같은 내용으로 추가해준다.
location /v2 {
            proxy_pass https://192.168.219.105:30765/nexus; # istio-ingressgateway nodeport
            proxy_http_version 1.1;
            proxy_set_header Upgrade $http_upgrade;
            proxy_set_header Connection "upgrade";
            proxy_set_header HOST $host;
            proxy_set_header X-Forwarded-For $proxy_add_x_forwarded_for;
            proxy_set_header X-Forwarded-Host $host;
            proxy_set_header X-Forwarded-Server $host;
            proxy_set_header X-Forwarded-Proto $scheme;
            proxy_ssl_ciphers 'ECDHE-ECDSA-AES256-GCM-SHA384:E...'# 생략
 }
nginx 서비스를 재시작하고 docker login을 해본다.

이제 사용하면 된다.
'CloudNative > Provisioning' 카테고리의 다른 글
| trivy (1) | 2024.12.20 |
|---|---|
| vault (1) | 2024.11.23 |
| nexus cli file upload (0) | 2024.10.25 |
| nexus gradle repository (1) | 2024.10.18 |
| jupyterhub + nexus pypi repository (1) | 2024.04.26 |